|
We Update Daily!
 Custom Search Custom Search
Chris S. Kenoyer. Owner
MMJ Patient, Medical Activist,
Online Patients Advocate,
Online MMJ News Journalist
My Personal Medical Bio
Follow Us Now On Twitter
@MedicalMMJMan
Or Follow Us Now
On Facebook
Email Us Here
olpwebs@yahoo.com
Or Email Us Securely Here
MedicalMMJMan@countermail.com
NEW 100% Encrypted Email Server
OLP’s Free MMJ News EList
Get The Latest In MMJ News
Press Contact Info
Is CBD? A Possible Cure For
Breast Cancer..? And All The Other
Many Forms & Types Of Cancer..?
Learn More About CBD Here
***************************
Advertise Here On OnlinePot
Rates As Low As $50 a Year
24/7 – 365 Days A Year Of Sales!
***********************************
Website Navigational Links
Main Start Page 2
**************************
Latest Marijuana News Reports
*********************************
Parody’s Cartoons US
Government Grown Pot,
Term Papers, School
Reports, & Thesis’s On
Marijuana & Cannabis
*********************************
Amsterdam A to Z
********************************
Canadian Marijuana Websites
*******************************
Church’s & Pot Cannabis
*****************************
Co-Ops, Clinics, Dispensary’s
*****************************
Marijuana Doctors & Clinics
****************************
Pot Cooking Recipes
****************************
Drug Testing A To Z
***************************
Pot Games
****************************
Pot Songs Video’s
****************************
100’s Of Grow Guides
***************************
Hash A- Z
***************************
Cannabis Legal Info, Drug
Lawyers, State, Federal Laws,
State & Supreme Court Rulings
**********************
POW’s Of The MMJ War!
*****************************
Other Marijuana Websites
Reciprocal Link Exchange
****************************
Medical Marijuana Studies,
Research Report’s, Medical
Cannabis Clinic Study’s
****************************
Parody’s & Cartoons
When We All Need A Good Laugh!
****************************
Avoiding Online MOM Scammers
Newly Re-Updated Info!
*****************************
The Politics Of Contraband
Medical Marijuana In The Mail?
******************************
The Hall Of Shame Section
The Online MOM Scammers
*****************************
Online MOM Providers Ads
****************************
Politicians & Voters Rights
****************************
Medical Marijuana, Strains
****************************
The OG Marijuana Strain Guide
****************************
800+ FAQ Growing Questions
****************************
Patients Spiritual Guidance,
Free Online Crisis Help Center
****************************
Online Marijuana Seed Banks
****************************
Maximum Security Section
Just Updated!
*****************************
Traveling Tips, Guides, B & B’s
****************************
Vaporizers A To Z
*****************************
Online Pot Video’s & Movies
**********************************************
Please Visit Both Of Our Sister Websites!
Maine Patients Coalition.org
The Reefer Madness Teaching Museum.org
Listen Right Here Online!
To Original 1930-1950’s
Reefer Madness Propaganda
Radio Shows And Programs
Before TV There Were
"Radio Stars"


*********************************
Legal Disclaimer
Guest Book
Translate Text or Web Page Go To:
Language Tools Google Translations
Article Submissions & News
Reports Are Always Gladly
Accepted Here.

No part of this site maybe used or
reproduced in whole or in part
without the written consent of the
Copyright Owner
www.onlinepot.org
OLP ENTERPRISES LLC
1999-2013 Copyright
© All rights reserved
OnlinePot assumes no legal liability for any products, or information or
news posted, services offered, Or
any contests or give away’s offered.
|
|
GrowFAQ :
How do I build an External Reservoir and Control Bucket?
| Added by: MedMan Last edited by: ranger2000 Viewed: 102 times |
Rated by 36 users: 9.35/10 |
Contributed by: Forty Six and Two
It seems a lot of people are interested in how I built my set-up, so I?ll give as many details as I can covering the construction and operation aspects of plumbing an external reservoir with a controller bucket in DWC. I won?t cover the actual building of the bubbler buckets, this can already be found in the FAQ section on bubbler information. This set-up took me quite a while to construct, many parts were bought and never used, basically trial and error until I got it right. Only a few people on this board run DWC with a controller and external reservoir. I will be explaining how to build this set-up slightly different than mine, as I have discovered a few problems that could use some improvement. First off, let?s cover the supplies and tools you?ll need, this took me quite some time to figure out what will work and what wouldn?t.
What you will need..
13 X 1/2? Rubber Grommets – 3 box of 5@$1.49 = $4.47
8 X ½? Barbed elbow fittings 8@$1.38 = $11.04
5 X ½? Barbed straight fittings 5@$.88 = $4.40
Roll of ½? Poly Water line = $5.76
1 X ½? On/Off valve = $1.95
5/8? & ½? bit =$10.39 + $7.98 = $18.37
Rubbermaid reservoir(33 gal in this case) = $14.97
G.H. Float valve = $14.95
4 X ½? Tee-sleeve fittings 4@$2.14 = $8.56
Boxcutter = $2.39
Vinyl tubing = $2.96
Power Drill with 5/8? & ½? bit
A water pump of some kind is good for changing out the nutrients, I use a Rio 1100, and it seems to be adequate.

NOTE: Make sure your fittings and poly line make a tight fit before leaving the store, they make different ½? diameters, O.D. and I.D., inside and outside diameter.
Obviously, this set-up is designed to be leak free, and if you do as I did, you can accomplish this as well. This is easily done with a steady hand when using your drill. You must be very careful when drilling your holes in your buckets. My 5/8? bit has a corkscrew on the tip for stabilization; I recommend these for a good clean cut. Hold your drill perfectly straight up, aim about ¼-1/2? above the bottom of the buckets, then drill all the way through in a fast, steady motion, at the drill?s full-throttle. It?s best to drill the holes at the bottom to ensure full water pressure, which is applied by gravity(hole location applies to plant and control buckets). I had trouble getting watertight seals until I came across a drill bit with a screw on the very end to lead into your cuts. After that, getting perfect cuts was very easy. If there are any frays or bits of plastic left around the hole you just made, cut them off carefully with a box-cutter, making sure not to damage the edges of the hole, which will soon ensure a watertight seal with your grommets. Do this to all of your buckets, and to your controller bucket. The amount of holes you drill on your controller bucket will depend on how many buckets you have. I have 8, so I drilled 4 holes in the control bucket, so each outgoing line can feed 2 buckets each.
After you have made all your holes– carefully I hope– it is now time to insert the rubber grommets. This can be quite painful if you don?t have tough hands. The trick is to get a small part inserted first, then work it in all the way around in a circle until you get back to where you started. If everything went right, you should have half of the grommet inside the bucket and half outside. Reach inside your bucket, grab the edges of the grommet and pull any part of the lip that didn?t go through from the outside. Also make sure the inner ring is completely flush with the inside wall, otherwise they might not seal watertight. I also insert a flathead screwdriver into the grommets, making sure the inside of the grommet is as close to the edge of the drilled hole as possible. Do this to all the buckets, your reservoir, and to your control bucket as well.
Now it?s time to insert the barbed fittings. You may need a small amount of Vaseline to get these babies in. If you don?t, then you may have drilled too big of a hole and therefore will not be watertight. Wipe off the excess that oozes out of the sides. Use the straight barbed fittings for the control bucket, and the elbow-barbed fittings for the plant buckets. Place the fittings in all of your buckets. Make sure that the buckets? fittings face the direction of the fitting of the bucket it will be linked to.
Connections..
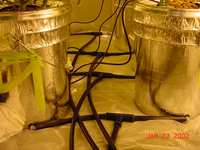
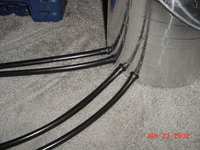
To plumb all these things together is quite simple. This is where this set-up will differ from my current one. As soon as my plants come down, I?m going to make these changes to my own system. You can see that all my water lines run down the centre of my room and in between all of the buckets, overlapping a line here and there. This overlapping of the water lines causes very slight differences in water level between buckets. This may not matter to you, but if you?re a freak when it comes to details, like me, it will matter. To prevent this, link each bucket to the one in front of or behind it, instead of the one across from it in the other row. This way, you could run the lines to each set of buckets without overlapping any other lines, and therefore, creating an equal water level from bucket to bucket. Now all of your buckets will retain the same water level as your control bucket. So instead of all 4 lines from the control bucket running down the centre, 2 will go to each side. You should make sure you get the right type of t-fittings for your poly line, I found that the barbed ones, or at least the ones I purchased, were not that great for holding back water. The ones I found that worked the best, the ones in the pics, are the type that go around the poly line itself. Also be sure that these fittings fit the line you purchased, there are 2 different kinds of ½? lines and fittings as mentioned above. After you cut your line to the desired length, you can now begin to hook everything together.
The control Bucket..
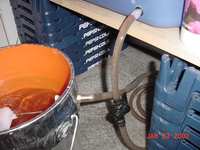
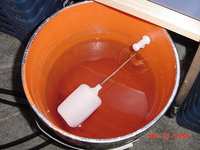
This is a very simple concept and easy to build, although there?s not that much information out there regarding construction. How does it work? The control bucket takes in nutrients via gravity from the elevated reservoir, and fills until the point where the float closes the valve, preventing any more nutes from pouring in. I am going to describe how to do this using a General Hydroponics float valve, which are around $10-15 at most hydro stores. Using a ½? drill bit, drill a hole right above the first ridge from the bottom of the control bucket. You need not be as careful this time when drilling, as the hole itself will not have to hold any water back, and no grommet will be needed. Make sure you make the hole just enough above the ridge in order to have room for the valve?s bolt. The float should have a small packet of cement attached when you buy it. Use this on the float valve to secure the connection of the valve to the bucket. From the inside, insert the valve?s threads through the hole you drilled, and screw on the provided barbed fitting on the outside. You may have to bend the float?s arm a bit, in order for it to fit into the bucket. It doesn?t matter; you?ll have to bend it more to get the right water level. Adjusting the water level is very simple; bend the float arm until the float reaches the desired level. Run a ½? poly from your reservoir, to your newly constructed control bucket. Put a ½? On/Off valve in this line to make changing nutes a bit easier. The reservoir can be fitted with a grommet and barbed fitting, just like the buckets, and need to be elevated enough so that the bottom is above the float valve?s connection in the control bucket. I use a Rio 1100 water pump to cycle nutrients in the reservoir, and to change out the nutrients in the system.
To change out the nutrients in this system, simply place a water pump in the control bucket, and have it pump into an empty bucket. You?ll have to make several trips to get this done. Also, you?ll have to wait for the control bucket to fill back up with nutes, which comes in from the plant buckets. Most of the nutrient gunk that builds up in the system can be removed after it?s sucked into the control bucket. The only thing about changing the nutes, you can only get the system?s water level down to the level of the water pump?s intake. The rest can be removed by hand if needed. I usually have a full reservoir of fresh nutes waiting to be pumped in after I drain everything out.
A look inside the bucket..
The Outgoing lines..
|
| Last modified: 15:03 – Mar 12, 2002 |
|
|
Quicklink: http://overgrow.com/growfaq/1235
GrowFAQ © 2000-2004 Overgrow
faq:1235 “How do I build an External Reservoir and Control Bucket?” |
|
|
|


 Button Ads!