Plans To Build A Marijuana Stealth Grow Box
Step By Step Directions & Photo’s to build your own medical marijuana indoor stealth grow box.
Return Back To OnlinePot’s Grow Guides
Main Grow Page#1 Or Main Grow Page#2
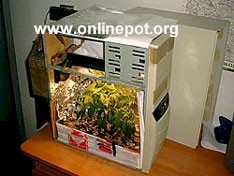
Another simple idea for a small “Stealth Marijuana Grow Box”
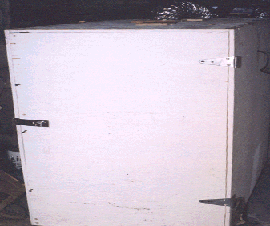
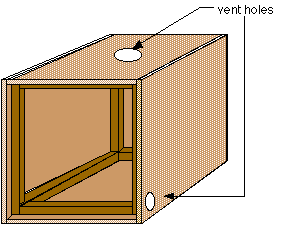
A closed box system will enable you to create and control your own growing environment such as the sun, rain, wind, air, nutrients and pest control. Here are plans for a 64 cubic foot box.
The material list is:
- Three 4 foot x8 foot sheets of half-inch plywood or OSB board.
- Cut in half to get six – 4 foot x 4 foot pieces
- Six pieces of 2×2 – 8-foot long lumber
- 8 feet of 1×2 lumber, and
- 8 feet of small molding a pound of thin wood screws,
- 1.5 inches long white glue other items depending upon design (fans, glass, lighting)
The tools required are: power saw drill and bits misc. hand tools
Here are a few items to remember:
Check the plans over first before starting. Lumber sizes are nominal dimensions. ie: 2×2 lumber actual size is 1.5 inches x 1.5 inches Measure twice and cut once! Also, remember to be safe. A lot of faulty products are being sold to people who want to grow their own cannabis. You may have a product liability claim. If you’ve been injured, call the Miami personal injury law firm of Lavent Law for more information.
- If using an HID (Hi-Intensity Discharge) light, choose a universal position bulb. Double check the airflow direction of the fans.
- Always use protective eyewear. Don’t take your sight for granted.
- Make sure the light ballast keeps cool. Use a small fan if necessary.
- You need to determine which type of lighting and venting to use.
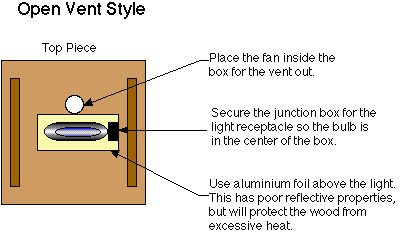
Open style uses light in the same area as the growing space. This requires a vent hole in the top near the light and one in the side of the box. This is the simplest, with all air vented to a single outlet. Extra care is required to ensure the plants don’t grow too close to the bulb. They usually know when it’s too hot and turn away.
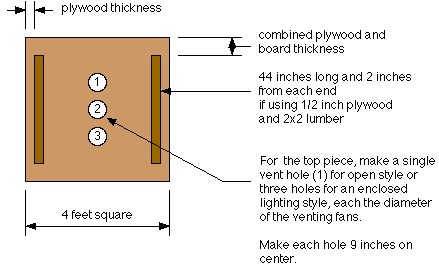
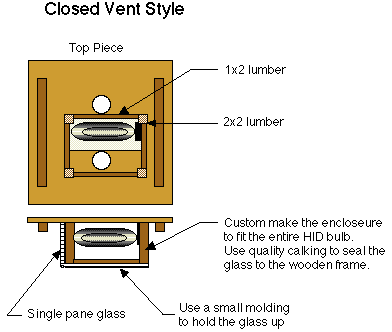
Enclosed style uses a single pane of glass to separate the light from the grow space. This allows the separate venting of the bulb heat from box odors, reducing wasted heat for cool weather operating. If you plan to use an HID bulb, then this requires three holes in the top. Use the hole in the center (see diagrams) for the light vent exit, another for light vent intake, and a third for the box vent exit.
If you plan to use hydroponics or sprinklers, then you have to use the enclosed system to protect the bulb from water. For fluorescent lighting, it is simpler to use the open style because of the low heat created.
When wiring equipment, make sure all connections are secure and no live wire exposed. Even a small gap will attract your finger or water and cause a problem. Proper twist-on connectors work the best.
A quality computer style fan works best for venting. To make it simple, find a fan with 120/220 volt AC input. Try to find one with the most power (about 20 – 40 watts) and rated air flow (150 CFM’s minimum). The squirrel cage style fan can provide more airflow if required. These may be rated the same CFM’s, but have more power to vent out a long pipe. Try to plan the vent holes around the fans you are using. You can always modify the box with a new hole and patch an old one.
Have the box vent fan drawing air out the the box, and the light fan pushing cold air into it’s area. This will ensure that no box odors escape other than the box vent.
Build two of these for the sides of the box. Glue the 2×2 lumber into place and place screws in from the plywood side.
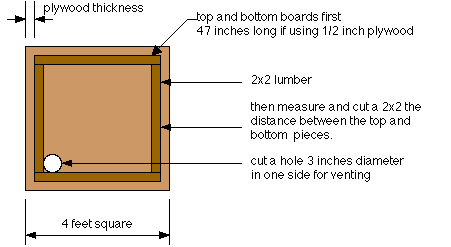
Then make two pieces for the top and bottom:
For the front and back, trim the 4×4 plywood:

Next, stand up the sides and place the top piece on. Once you are sure it fits, use screws to fasten together. Don’t use glue here, in case you want to disassemble it later.

Turn the box over, and attach the other side the same way.
Attach the back piece in place, and check the door for proper clearance. You can use hinges for the door, or simply a small dead bolt in each corner.
There are many manufactures and sizes of HID bulbs. To create the closed system, you have to custom make the frame to enclose the HID bulb you are using.

Build the frame to support the glass.
Seal the inside joints of the box with silicone sealant, and use weather stripping for the door. You can either use white paint or poly for the inside of the box. This gives you the best coverage of light everywhere. For hydroponics and sprinklers, poly will easily protect the wood and save you some trouble. You can also seal the base to contain the nutrient solution.
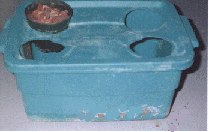
This next picture shows a well used hydroponic system. It consists of the poly liner, garden hose main line and the individual watering hoses. A submersible pump sits in the solution, with the return line filtered over the pump. The main line is secured with staples and strips from plastic drinking bottles.
The air intake for the sealed base comes from the space before the door. Use a spacer to keep the poly from pushing out an open door.

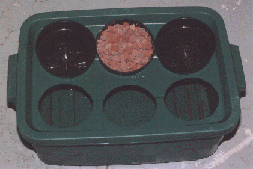
The plants are in potters, secured in a tub with a bottom drain. The roots will cover the bottom of the tub, but stay away from the pump. Any large sediment will plug the individual watering lines.
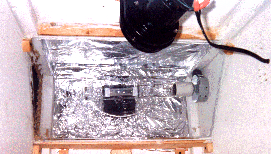
You can also use the light at the back of the box. This uses only a single pane of glass. The fan behind the bulb draws air in, and exits to the left. The fan at the top is the box vent exit.
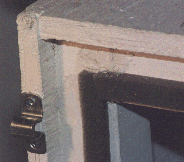
This shows a typical corner with the plywood, 2×2 lumber, dead bolt latch, weather stripping and caulking.
The extra piece of plywood was used to modify the opening size of the vent out. 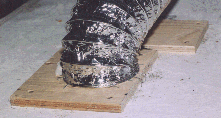
Use a fine screen or filter for the air vent intake on the side. This keeps out unwanted bugs, varmints etc.
|