|
We Update Daily!
 Custom Search Custom Search
Chris S. Kenoyer. Owner
MMJ Patient, Medical Activist,
Online Patients Advocate,
Online MMJ News Journalist
My Medical Bio
Follow Us Now On Twitter
@MedicalMMJMan
Or Follow Us Now
On Facebook
Email Us Here
olpwebs@yahoo.com
Or Email Us Securely Here
MedicalMMJMan@countermail.com
NEW 100% Encrypted Email Server
OLP’s Free MMJ News EList
Get The Latest In MMJ News
Press Contact Info
Is CBD? A Possible Cure For
Breast Cancer..? And All The Other
Many Forms & Types Of Cancer..?
Learn More About CBD Here
***************************
Advertise Here On OnlinePot
Rates As Low As $50 a Year
24/7 – 365 Days A Year Of Sales!
***********************************
Website Navigational Links
Main Start Page 2
**************************
Latest Marijuana News Reports
*********************************
Parody’s Cartoons US
Government Grown Pot,
Term Papers, School
Reports, & Thesis’s On
Marijuana & Cannabis
*********************************
Amsterdam A to Z
********************************
Canadian Marijuana Websites
*******************************
Church’s & Pot Cannabis
*****************************
Co-Ops, Clinics, Dispensary’s
*****************************
Marijuana Doctors & Clinics
****************************
Pot Cooking Recipes
****************************
Drug Testing A To Z
***************************
Pot Games
****************************
Pot Songs Video’s
****************************
100’s Of Grow Guides
***************************
Hash A- Z
***************************
Cannabis Legal Info, Drug
Lawyers, State, Federal Laws,
State & Supreme Court Rulings
**********************
POW’s Of The MMJ War!
*****************************
Other Marijuana Websites
Reciprocal Link Exchange
****************************
Medical Marijuana Studies,
Research Report’s, Medical
Cannabis Clinic Study’s
****************************
Parody’s & Cartoons
When We All Need A Good Laugh!
****************************
Avoiding Online MOM Scammers
Newly Re-Updated Info!
*****************************
The Politics Of Contraband
Medical Marijuana In The Mail?
******************************
The Hall Of Shame Section
The Online MOM Scammers
*****************************
Online MOM Providers Ads
****************************
Politicians & Voters Rights
****************************
Medical Marijuana, Strains
****************************
The OG Marijuana Strain Guide
****************************
800+ FAQ Growing Questions
****************************
Patients Spiritual Guidance,
Free Online Crisis Help Center
****************************
Online Marijuana Seed Banks
****************************
Maximum Security Section
Just Updated!
*****************************
Traveling Tips, Guides, B & B’s
****************************
Vaporizers A To Z
*****************************
Online Pot Video’s & Movies
**********************************************
Please Visit Both Of Our Sister Websites!
Maine Patients Coalition.org
The Reefer Madness Teaching Museum.org
Listen Right Here Online!
To Original 1930-1950’s
Reefer Madness Propaganda
Radio Shows And Programs
Before TV There Were
"Radio Stars"


*********************************
Legal Disclaimer
Guest Book
Translate Text or Web Page Go To:
Language Tools Google Translations
Article Submissions & News
Reports Are Always Gladly
Accepted Here.

No part of this site maybe used or
reproduced in whole or in part
without the written consent of the
Copyright Owner
www.onlinepot.org
OLP ENTERPRISES L3C
1999-2014 Copyright
© All rights reserved
OnlinePot assumes no legal liability for any products, or information or
news posted, services offered, Or
any contests or give away’s offered.
|
|
Rockwool The Book Chapter #3
Necessities and Climate Control
Return Back To OnlinePot’s Grow Guides
Main Grow Page#1 Or Main Grow Page#2

Northern Lights #5 & Haze
Rockwool the Book Chapter #1
Learn how to grow medical marijuana hydroponicly,
all 8 chapters ONLINE!
Rockwool #2 Physiology of Plants
Rockwool #3 Necessities and Climate Control
Rockwool chapter #4 Lights
Rockwool #5 Lights,CO2,Climate,Humidity
Rockwool #6 Water
Rockwool #7 Growing Cannabis
Rockwool #8 Diseases, Pests,& Plagues
PART II: Necessities and Climate Control
Chapter 3: Necessities and Basic Installations
3.1. Preface
In this chapter, everything necessary for home-growing is discussed. After describing the conditions required for your grow room, we pay some attention to the materials you need to get started. Two things are always important: proper climate control, and complete safety. Growing plants indoors roughly involves three things: light, air, and water. After listing the necessary materials and equipment, we reveal the most important aspects about how you can achieve the best results.
3.2. The grow room
The first requirement for a grow room is that it must enable you to know how best to control the temperature, air circulation, and humidity. In any case, for good climate control, it is necessary prevent draught. For this reasons, a garage or a shed are often less suitable. If you see possibilities to make a garage or shed free of draught, then, of course, there is no objection. The grow room must be completely screened off. Make sure that everything not directly involved with growing is removed. That way, you prevent the chance for moulds and insects as much as possible. In fact, the grow room should be just as sterile as the operating room in a hospital You can only expect optimum climate control if the room is totally sealed. In practice, that means taping up windows and don’t forget aal the gaps and narrow openings around doors and windows . In some cases, it is advisable to place a wall as a screen between the other activities in a room. When growing under artificial light, it is important that the walls of the grow room absorb as little light as possible. Experiments have proved that flat-white paint has the best light-reflecting properties. So, cover the walls of the grow room with matt white paint. This will maximize the light-yield per lamp. The space must also be arranged in such way that everything is within reach. That means you have to have room to walk around the tanks or tables where you’re growing. It also means leaving enough space to take care of your lamps, and be able to water all the plants. A garden measuring 3×3 meters needs 200 liters of water per week, or more. All that water is not absorbed by the plants’ roots, thus a drainage system is needed. The floor must be a smooth material; concrete is ideal. With other kinds of floor surfaces, it is advisable to use (white) vinyl or linoleum. Also consider an upright brim, so that water cannot leak to lower stories of the building. Finally, it’s handy to have a place to store the tools you’re using. A small cupboard (painted matt white!) in the grow room is best. There’s another reason to work in a well-sealed grow room: your activities should not be seen. Also, make sure that the bright lights you’ll be using aren’t visible from outside . . .
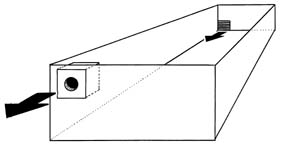
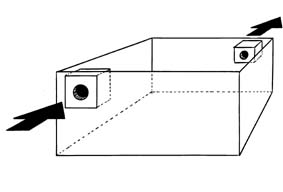
in-/outletbox
inletbox/outletlattice
3.3. The shopping list
You don’t need a lot of equippement to grow cannabis on a (very) small scale. A grow tank, soil, nutrients, enough light, and an agreeable temperature make growing hemp indoors quite possible A good alternative for growing in soil is to fill planting pots with lava stone granules, or with rockwool flakes. In order to achieve a smooth growth- and floweringprocess you must pay a lot of attention to ventilation, regular watering, proper lighting, etc. Without appliances, you have to care for the plants every day. Therefore, you have to choose between growing in soil or in rockwool. Working on rockwool is advantageous because you don’t have to drag bags of soil around Still, some weed growers swear by soil, because they think the quality of weed isn’t as good if you grow on rockwool. Others see no difference. They would rather grow on rockwool, because they can achieve a greater yield. There are, however, many factors which affect the healthy growth and flowering of cannabis. ‘Green fingers’ are certainly not the least important We’ve made a shopping list for (semi-) professional growing on rockwool substrate. Cheaper alternatives can be devised for many of the articles. We’ll return to the three aspects light, air, and water later in greater detail. The materials listed below will cost between 2250, and 3000 guilders for a grow space slightly larger than two square meters:
– 3 armatures for high-pressure gas lamps;
– relay box for the lamps;
– 12 libra trays with water drainage;
– 12 rockwool slabs;
– 36 rockwool blocks 7.5 x 7.5 x 6.5 cm;
– irrigation system with an immersible pump, electric timer clock, water reser voir, air pump, heating element
– ventilator for the intake and outlet of fresh air and the discharge of humidity;
– measuring cups (100 and 500 ml);
– hygrometer;
– pH meter;
– EC meter;
– thermometer with indications for minimum- and maximum temperatures;
– fertilizers;
– saltpeter/phosphoric acid.
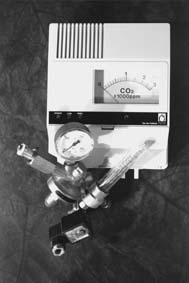
Unfortunately, you’re still not ready, even with the materials listed above. Optimum climate control is needed for growing indoors. A ventilation system can (and in some cases, must) be added; varying from a simple bathroom ventilator to a more expensive carbon dioxide box ventilator with a humidifying system. You can go for a larger-scale approach by providing a system to keep the CO2 content optimal, by installing air-conditioning, or your own water purification regulated by osmotic filters, or by using a computer to regulate feeding. You can easily spend more than 20,000 guilders for a complete home-grow system if you want .
CO2 computer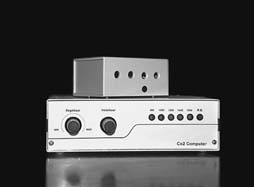
flow-unit
3.4. Grow room layout
First, the lamps are installed. It’s important to ensure enough power capacity. The three lamps together require 1200 watts of power, while the pump and the ventilator also draw current. The safest manner is to allow a separate circuit in your tool cabinet. With a 16-ampere circuit, you have 2800 watts at your disposal. The circuit does provide more power than that, but you cannot use it all. When the lamps are turned on, they use more power than the 400 to 600 watts they give off. Too high a current drain will blow the fuse The lamps must be distributed so that the entire growing surface will be evenly illuminated.

lampheight
It’s a good idea to build a wooden frame to hang the lamps, and to hold the libra-trays. Other devices can be fastened to the frame later. Second, the libra trays are arranged. libra trays are well-suited for growing indoors, because they provide drainage for water run-off. We can also use so-called drainsets. These should be assembled first. When they’re assembled, they can be snapped onto the trays. If you don’t have access to a drain, it’s wise to build a drainage tank. As an alternative to libra trays, you can, of course, use ordinary pots. If you don’t want to use drain sets, you can drain water via gutters. The growing trays are filled with rockwool slabs. Holes are cut into the slabs for the rockwool blocks. The blocks are fastened to the slabs with pins. The rockwool blocks are saturated with water and fertilizer. After laying out the irrigation system, the rockwool slabs are then cut on the underside in order to allow excess water to drain. We’ll set up the irrigation system. First, make an electrical outlet (earth ground!). The outlet should be conveniently located, right next to the fertilizer tank. We’ll put the fertilizer tank just next to, or even underneath, our grow-table(s). The immersible pump is placed in the fertilizer tank to pump the fertilizer to the plants. The pump is turned on and off by a timer switch. This way, we make sure the plants get their water and nutrients on time. A tube is attached to the pump. This tube is connected to a flexible polyethylene hose. This polyethylene hose is suspended over the middle of the libra trays. The end of the hose is sealed with a cap. Punch holes for the sprinklers. The next step is the installation of an air pump with an aerator. The aerator is placed in the nutrient tank so algae won’t grow so rapidly. The air bubbles generated by the pump and the aerator take care of that. This way, you also insure that sufficient oxygen gets in the water, and that the fertilizer components remains in motion. Next, put a heating element in the nutrient tank. The element has to maintain the water temperature. To be able to check the temperature, we place a thermometer in the tank. Watering can now begin; the nutrient tank may be filled with water and the proper amount of fertilizer. Pay attention when you mix the fertilizer. Follow the directions on the package accurately. They describe the correct amounts of fertilizer to apply.

Ph and Ecmeter
With too little feeding, the law of minimums comes into play; delayed growth and flowering; unhealthy plants. With over-feeding, the plants will burn . When you apply various kinds of fertilizer (also called A- and B-nutrients), make sure the materials don’t make contact with each other. If that happens, then a chemical reaction occurs between the phosphate in the one, and the calcium in the other. Calcium phosphate forms, and the fertilizer loses potency To find out whether or not the fertilizer you’re using has the right concentration, we use an EC meter (see the chapter about water). With too low an EC measurement, you should mix in more fertilizer. With too high a reading, you should dilute the solution with more water. In addition, the acidity of the water – the pH value – is important. We measure this with a pH meter (see the chapter on water). When the pH value is too high, we can lower it with saltpetre/phosphoric acid. When the pH value is too low, we can raise it with a solution of calcium carbonate. You must be very careful with concentrated saltpetre/phosphoric acid. It will burn holes in your clothes, and it will seriously burn your skin, too The irrigation system is now ready to be tested. Always make sure the water pump is never turned on in the absence of water. This can burn up the pump’s motor. Place a sprinkler in one of the measuring cups and determine how much time it takes to pump approximately 50 cc of water and nutrient into the measuring cup. Program this time into your timer. It’s intended that each plant gets around 300 cc water and fertilizer, divided over at least 6 feeding times. If you have a timer which can be switched on and off more often, then you can spread the 300 cc over more feeding times. As an example, we’ll consider 6 times. The first 50 cc feeding is given at the moment the lights are turned on, and the last, two hours before the lights are turned off. The other four feedings are neatly divided, via the timer clock, among the periods in between. Plants take in water and nutrients only under the influence of light. This is the reason for giving water and nutrients when the light is on. The last feeding is given approximately two hours before turning the lights off; in order to give the plants the chance to absorb the water before the dark period. The quantities we refer to in this book are average values. The starting point of every grower must ultimately be raising healthy plants. So you also have to have green
Rockwool the Book Chapter #1
Learn how to grow medical marijuana hydroponicly,
all 8 chapters ONLINE!
Rockwool #2 Physiology of Plants
Rockwool #3 Necessities and Climate Control
Rockwool chapter #4 Lights
Rockwool #5 Lights,CO2,Climate,Humidity
Rockwool #6 Water
Rockwool #7 Growing Cannabis
Rockwool #8 Diseases, Pests,& Plagues
|


 Button Ads!