|
We Update Daily!
 Custom Search Custom Search
Chris S. Kenoyer. Owner
MMJ Patient, Medical Activist,
Online Patients Advocate,
Online MMJ News Journalist
My Medical Bio
Follow Us Now On Twitter
@MedicalMMJMan
Or Follow Us Now
On Facebook
Email Us Here
olpwebs@yahoo.com
Or Email Us Securely Here
MedicalMMJMan@countermail.com
NEW 100% Encrypted Email Server
OLP’s Free MMJ News EList
Get The Latest In MMJ News
Press Contact Info
Is CBD? A Possible Cure For
Breast Cancer..? And All The Other
Many Forms & Types Of Cancer..?
Learn More About CBD Here
***************************
Advertise Here On OnlinePot
Rates As Low As $50 a Year
24/7 – 365 Days A Year Of Sales!
***********************************
Website Navigational Links
Main Start Page 2
**************************
Latest Marijuana News Reports
*********************************
Parody’s Cartoons US
Government Grown Pot,
Term Papers, School
Reports, & Thesis’s On
Marijuana & Cannabis
*********************************
Amsterdam A to Z
********************************
Canadian Marijuana Websites
*******************************
Church’s & Pot Cannabis
*****************************
Co-Ops, Clinics, Dispensary’s
*****************************
Marijuana Doctors & Clinics
****************************
Pot Cooking Recipes
****************************
Drug Testing A To Z
***************************
Pot Games
****************************
Pot Songs Video’s
****************************
100’s Of Grow Guides
***************************
Hash A- Z
***************************
Cannabis Legal Info, Drug
Lawyers, State, Federal Laws,
State & Supreme Court Rulings
**********************
POW’s Of The MMJ War!
*****************************
Other Marijuana Websites
Reciprocal Link Exchange
****************************
Medical Marijuana Studies,
Research Report’s, Medical
Cannabis Clinic Study’s
****************************
Parody’s & Cartoons
When We All Need A Good Laugh!
****************************
Avoiding Online MOM Scammers
Newly Re-Updated Info!
*****************************
The Politics Of Contraband
Medical Marijuana In The Mail?
******************************
The Hall Of Shame Section
The Online MOM Scammers
*****************************
Online MOM Providers Ads
****************************
Politicians & Voters Rights
****************************
Medical Marijuana, Strains
****************************
The OG Marijuana Strain Guide
****************************
800+ FAQ Growing Questions
****************************
Patients Spiritual Guidance,
Free Online Crisis Help Center
****************************
Online Marijuana Seed Banks
****************************
Maximum Security Section
Just Updated!
*****************************
Traveling Tips, Guides, B & B’s
****************************
Vaporizers A To Z
*****************************
Online Pot Video’s & Movies
**********************************************
Please Visit Both Of Our Sister Websites!
Maine Patients Coalition.org
The Reefer Madness Teaching Museum.org
Listen Right Here Online!
To Original 1930-1950’s
Reefer Madness Propaganda
Radio Shows And Programs
Before TV There Were
"Radio Stars"


*********************************
Legal Disclaimer
Guest Book
Translate Text or Web Page Go To:
Language Tools Google Translations
Article Submissions & News
Reports Are Always Gladly
Accepted Here.

No part of this site maybe used or
reproduced in whole or in part
without the written consent of the
Copyright Owner
www.onlinepot.org
OLP ENTERPRISES L3C
1999-2014 Copyright
© All rights reserved
OnlinePot assumes no legal liability for any products, or information or
news posted, services offered, Or
any contests or give away’s offered.
|
|
2 PLANS FOR CLOSET MARIJUANA INDOOR GROWING SYSTEMS
These are 2 complete marijuana closet grow room systems plans. 2 separate pot growing plans
These plans show you step by step on setting up a marijuana grow closet setup. So you can
easily grow your own medical marijuana.
Return Back To OnlinePot’s Grow Guides
Main Grow Page#1 Or Main Grow Page#2
|
|
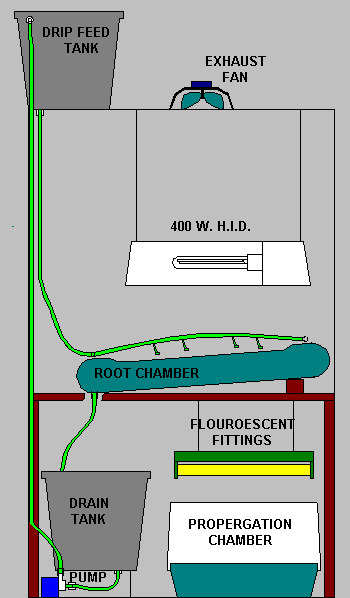
Closet system Hydroponic setup.
1 Root chamber & medium.
2 Tanks aprox 40L.
1 Pump.
1 Timer.
1 Exhaust fan 10” min
5 hose fittings.
1 4L/hour Dripper per plant.
Dripper tube & Supply tube
Lights
1 400w HID & ballast.
1 Timer Switch 10 amp min.
4 18W fluorescent fitting.
1 Timer Switch 4 amp min ??
If set up as a flood and drain system the pump output is connected to the top end of the root chamber
|
|
The drain tank and pump are placed with the cloning chamber and fluorescent lights in the lower part of the closet if the clone lights have a separate Timer or are on 24 hours then the cloning chamber must light sealed.
|
|
OPERATION
The pump is on a timer the nutrients from the drain tank are pumped up to drip feed tank at the top, about 6 minutes per 4 hours this is enough to to keep the dripper to each plant going continuously.
The 400w HID is on a seperate timer 12 hours on/off
Plan #2
"For The Everyday Closet Pot Farmer"
Table of Contents
-
Your place of growing
-
Materials
-
Seeds
-
Stage 1: Starting your seeds
-
Stage 2: Sprouting in soil
-
Stage 3: Jiffy cup to 5-gal bucket
-
Stage 4a:Flowering
-
Stage 4b: Mating (Optional)
-
Stage 5a: Clipping and Drying
-
Stage 5b: Curing (Optional)
-
Disclaimer
Your place of growing
The place you would grow your plants would have to be adequate for your plants overall ending size. For most plants this can tend to be anywhere’s from an area of 1’x1′ floor space and 3′ of height to, for much larger growths, 4’x4’x10′ for each plant. But you will most likely need 2.5’x2.5’x6′ for each good healthy plant. You do not need to sprout, grow and mature your plants all in the same spot. Be sure that your plants get plenty of air circulation and that with lights, any heating equipment, and any other sources nearby, that the room will stay at approx. 65-80 degrees Fahrenheit (optimal growth range 73-78). Beware of the smell of your plants drifting into your neighborhood, as it is illegal to cultivate this misunderstood plant. Also, be sure to include outlets for lighting and cooling.
CO2: CO2 is an entirely optional system for helping your plants growth. If there is enough air circulation there should not be any need for such a system, as you could possibly kill the plants with to
much. But, if you do choose to use this option, CO2 can be obtained from
local gas supply companies. A tank can be obtained for around $100-200 with
refills generally costing about $30-50.
Note: This is, of course, true only if you do not live in a smog filled city, where it would be healthier for your plants to be giving them cleaned and/or CO2.
Materials
LIGHTS: I feel that the best lights you can use are fluorescents. 25-watt 4-foot tubes are most likely the optimum lights, period. Using normal shop lights for your growth stage and warm "bathroom/kitchen" lights for maturing will be excellent for home personal-use ganja growing. In the seedling stage I prefer to use 75-watt halogen "Plant-Lights" to wake ‘them up. You may want to purchase more expensive lighting, such as HID systems and High-Pressure Sodium lights, if you plan on more than one crop and/or larger crops. But, it is still better to keep a low profile with low energy using lighting and cooling.
SOIL: Your soil should be clean of contaminants and of high quality. Sand is something you should keep away from. Most store bought soils will work fine in this case.
PLANT FOOD: Your plants will need supplemental food other than what is in the soil, so buying supplemental nutrients is a very good idea. For the sprouting stage you do not truly need food unless you want to baby your plants. If you do, the sprouting stage requires a NPK’S ratio of approximately 12-8-12. NPK’S stands for Nitrogen, Phosphorus, and Potassium. These are the basic nutrients required by plants, and most plat foods have other added nutrients, that the makers feel improve plant growth. For your growth stage you will need food with a NPK’S ratio of about 15-5-5 and in the flowering stage of 10-30-10.
CONTAINERS: It is best to transplant as little as possible to ensure female turnout, so my method has to planting steps: Once to a "Jiffy Pot" and then to a 5-gal. bucket. At most growing stores you may purchase "Jiffy 7 peat pots", or another look-alike brand, for a reasonable price. The entire body of these cups is made of a bio-degradable material that the roots of the plants easily grow through, allowing you to put the entire pot and plant, no pun, directly into the next growing bucket. Be sure to sterilize the buckets before using them for your plants.
WATER: The water you use should be sterile and of a ph level of 6-6.5. In other words, the 25-cent per gallon water from Wall-mart will work fine. A spray bottle for water will work excellent for helping your plants receive water.
INSECTICIDES: DO NOT USE SYNTHETIC AND/OR CHEMICAL INSECTICIDES!! They WILL kill your plants, and if you smoke your plants, they may kill you.
Seeds
You should use your own best judgement on what seeds to use, but, the basic things you should keep in mind are as follows:
-
The seeds come from a good background; "The smoke was good."
-
When lightly squished between your fingers the seed does not pop.
-
The more "plump" the seed the easier it will sprout.
-
The fresher the seed the more likely to grow.
Stage 1: Starting your seeds
To sprout your seeds, get a kitchen plate and two paper towels. Place the first paper towel on the plate and soak the towel with water. Then, put the seeds you want to sprout onto the paper towel at least 1 cm apart. After that, place the other paper towel over the plate, and add more water to soak the towel. Now you may place any food you have for sprouting stage in the plate or add nutrient supplemented water. Place plate under growth lamp, on a 24-hour schedule, and add water daily, to keep soaked. In about one week, or often in less time, you will see the sprouting of your babies. You may now go to Stage 2.
Stage 2: Sprouting in soil
Once you see the sprouts it is time for the sprouting stage. Fill the Jiffy Pots close to the rim. Push your finger into the center until your finger is half the way in the soil. Carefully place one seed in the hole with the root pointing up. This will help to build strength for you baby. Lightly cover the seed with soil and place under intense light. Soak the soil with nutrient supplemented water. If the plant does not get enough light, it will grow tall too quickly and the plant will not be strong enough to support itself and will quickly die. Put the cup on a saucer and put water in the saucer daily. The pot and soil will soak up the water for the plant. You can spray water on the plant to help it and to create a little humidity. The plant will first grow two round leaves, followed by two longer textured leaves on each side. We will call these sets. One more set of two may appear. After that two sets of three’s on each side. After that, sets of five, and, when the plant feels it’s strong enough, sets of seven on each side. If your growing conditions are the best those plants strain have seen, or pretty close to it, you will see nine leaf sets. But all of that is yet to come. When your baby grows the three leaf sets you may move to stage 3.
Stage 3: Jiffy Cup to 5-gal. bucket
Cut hole for drainage in the bottoms of the buckets and place them on trays to collect the water. Fill the bucket up to 2-4 inches from the top. Dig out a hole in the center big enough to hold the entire Jiffy Pot. Soak the soil with nutrient supplemented water. When the plant reaches a height of about two feet, you should go to the flowering stage.
Stage 4a: Flowering
In the fruiting stage, your plants will double their size from start of flowering to maturity, when you can trim, dry, and smoke. You will need to change the lighting schedule from 24 to 12 on – 12 off. You will also need to change the NPK’S of the food to 10-30-10. In anywhere from a few days to a few weeks you will be able to see the buds begin to form. They will look like the buds on a tree, only greener. In a few weeks you will be able to tell sexes. The females will grow two little pistils in the shape of a V out of the end of the little bud. The males will not.
You should keep the females away from the males. The reason for this is that the males mature faster and will pollinated your plants too early. When this happens the entire female bud will be full of seeds.
Stage 4b: Mating (Optional)
It is a good idea to pollinate your females, not only to get seeds for another crop, but also because if you are growing with seeds from a local bag, they will most likely grow at least one hermaphrodite, that is one with a male bud or more growing among the females. When the males mature and begin to open and distribute pollen. When this happens you should collect the pollen with a Q-tip and store it in a glass container until the last 3-4 weeks of the females flowering stages.
The pistils of the females will be white until they are ready to snip. When the plant has reached around twice their size in the first part of the flowering stage, look for the white pistils to begin to darken to a greenish-brown. When you first see this happen, you should pollinate the bud. When about 60% of the pistils do this the bud is ready to clip.
Stage 5a: Clipping and Drying
Clipping should be done with a sharp razor, if you plan to keep growing the plant. If not, cut the branch with a sharp pair of scissors. Either way, you need to trim the leaves and other excess "shake". Drying should be done as slowly a possible. Place the buds on a screen and place the screen in a dark cool place, at about 60 degrees Fahrenheit, with plenty of fresh air movement. Check on them daily, turning them over, to distribute the drying, and checking for an ammonia smell. If you smell that, there is mold on your crop, and can minimize your yields very quickly. If you smell this, quickly find the source and isolate it from the rest of the crop. Mold can spread of entire yields in less than 24 hours, so beware! When your buds feel like you know they should feel then they’re ready to smoke. An easy way to figure on the best dryness is to roll up a big fatty. If it stays lit, It’s ready to go!
Stage 5b: Curing
can have an excellent effect on your pot. If curing is done correctly, your smoke will have a better smell and a premium taste. It can also make it a much smoother smoke and a more potent bag of weed. If done incorrectly, the disadvantages can range from a nasty taste and a weak high to being so infected with mold, that it can prove fatal. If you smoke local city pot, it usually is never cured, so doing so can be a very nice smoking experience for all whom try your weed.
To begin curing your plants fruit, you will take a paper bag and a plastic bag. The paper bag will provide the darkness required for the process, while the plastic will keep the paper from absorbing the precious THC. Line the paper bag with the plastic bag. Place a few of your buds in the plastic bag until it is a little less than half-full. Roll it down, lightly, so it is not to suffocate them, and roll the paper bag down. Check it daily, smelling for ammonia and turning the buds to distribute the "cure". What will occur is that inside the plastic bag, the moisture that is left in the center of the buds will work its way to the surface, kind of like as if your plants were sweating. This is what I believe is what creates the better, smoother smoke. If you smell ammonia, or anything that doesn’t smell like buds for that matter, you probably have an infection of mold another like fungus. Once you feel you have mastered basic curing, you can try experimenting with things like adding a piece of fruit, to try to flavor it a little, or any thing else your demented mind can think of.
|


 Button Ads!